Wood Filler for Laminate Flooring: A Comprehensive Guide
Laminate flooring, renowned for its durability, affordability, and aesthetic versatility, remains a popular choice for residential and commercial spaces. However, despite its resilient nature, laminate flooring is still susceptible to damage, including scratches, chips, dents, and cracks. When such damage occurs, the appearance of the floor is compromised, and if left unattended, the issue can potentially worsen over time, leading to more extensive and costly repairs. While complete replacement of damaged planks is an option, it's often unnecessary and impractical for minor imperfections. This is where wood filler emerges as a valuable solution, offering a cost-effective and efficient way to repair and restore laminate flooring to its original condition.
This article provides a comprehensive guide on the use of wood filler for repairing laminate flooring. It explores the types of wood fillers suitable for laminate, the preparation process, the application techniques, and the finishing touches required to achieve a seamless and long-lasting repair. Understanding the nuances of working with wood filler on laminate will empower homeowners and professionals alike to address minor damage effectively and preserve the beauty and longevity of their laminate floors.
Understanding the Nature of Laminate Flooring and its Vulnerabilities
Laminate flooring is a multi-layered synthetic product designed to mimic the appearance of natural wood, tile, or stone. Typically, it comprises four layers: a wear layer, a decorative layer, a core board, and a backing layer. The wear layer, usually made of aluminum oxide, provides protection against scratches, stains, and fading. The decorative layer is a high-resolution photographic image that provides the visual appeal of the flooring. The core board, often made of high-density fiberboard (HDF) or medium-density fiberboard (MDF), provides stability and resistance to impact. Finally, the backing layer provides balance and helps to prevent moisture from penetrating the core.
While the wear layer offers considerable protection, it is not impervious to damage. Sharp objects, heavy furniture, and abrasive materials can still cause scratches. The core board, while dense, is susceptible to chipping or denting upon impact. Furthermore, moisture can infiltrate the core board through cracks or gaps, leading to swelling and warping. Understanding these vulnerabilities is crucial in determining the appropriate repair strategy and selecting the correct type of wood filler.
It is important to distinguish between wood filler and wood putty. While both are used for repairing wood surfaces, they have different properties and applications. Wood filler is designed to fill holes and cracks, and it typically hardens as it dries. It is often used for repairs that require structural integrity. Wood putty, on the other hand, is softer and more pliable, and it typically remains somewhat flexible even after it dries. It is often used for filling nail holes and minor imperfections. For most laminate flooring repairs, wood filler is the preferred choice due to its ability to create a durable and long-lasting bond.
Selecting the Right Type of Wood Filler for Laminate
Choosing the appropriate wood filler for laminate flooring is crucial for achieving a successful and aesthetically pleasing repair. Several types of wood fillers are available, each with its own strengths and weaknesses. Factors to consider when selecting a wood filler include the size and depth of the damage, the desired color and texture, and the ease of application and sanding.
Acrylic-based wood fillers are a popular choice for laminate repairs due to their ease of use, fast drying time, and ability to be painted or stained. They are typically water-based and emit low VOCs (volatile organic compounds), making them a more environmentally friendly option. Acrylic fillers are suitable for filling small to medium-sized cracks and dents. However, they may not be as durable as epoxy-based fillers for larger repairs.
Epoxy-based wood fillers offer superior strength and durability, making them ideal for repairing larger cracks and chips in laminate flooring. They consist of two components that must be mixed together before application. Epoxy fillers are waterproof and resistant to shrinking and cracking, making them suitable for areas prone to moisture exposure. However, they typically have a longer curing time and require more careful application than acrylic fillers. Additionally, epoxy fillers may be more difficult to sand and may require the use of specialized tools.
Color-matched wood fillers are specifically designed to match the color and grain pattern of various types of wood and laminate flooring. These fillers contain pigments that mimic the natural colors of wood, allowing for a seamless repair that blends in with the surrounding flooring. Color-matched fillers are available in a wide range of colors and can be custom-blended to achieve a perfect match. They are particularly useful for repairing damage in areas where the color and grain pattern are highly visible.
Regardless of the type of wood filler chosen, it is essential to select a product that is compatible with laminate flooring. Some wood fillers may contain solvents or chemicals that can damage the laminate's surface or affect its adhesive properties. Always read the manufacturer's instructions carefully and test the filler in an inconspicuous area before applying it to the damaged area.
The Repair Process: Preparation, Application, and Finishing
The success of any laminate flooring repair hinges on meticulous preparation, precise application of the wood filler, and careful finishing. Each stage is important to ensure a durable, seamless, and aesthetically pleasing result. The following provides a step-by-step guide to the repair process.
Preparation is Key: The first step in the repair process is to thoroughly clean the damaged area. Remove any loose debris, dirt, or dust using a vacuum cleaner or a damp cloth. If there are any sharp edges or splinters, carefully remove them with a utility knife or sandpaper. Ensure the area is dry before applying the wood filler. This step is crucial for ensuring proper adhesion of the filler to the laminate surface.
Next, consider using painter's tape to protect the surrounding flooring from accidental spills or smudges of wood filler. Apply the tape around the perimeter of the damaged area, creating a clean and defined workspace. This will also help to prevent the filler from spreading beyond the intended area and make it easier to clean up afterwards.
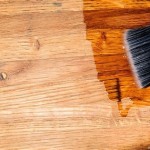
Applying the Wood Filler with Precision: Once the area is prepared, it is time to apply the wood filler. Use a putty knife or a small spatula to scoop up a small amount of filler and apply it to the damaged area. Press the filler firmly into the crack or dent, ensuring that it fills the void completely. Overfill the area slightly, as the filler will shrink as it dries. Avoid applying excessive pressure, as this can damage the surrounding laminate surface.
Smooth the surface of the filler with the putty knife, creating a level and even finish. Remove any excess filler from the surrounding area with a clean cloth. If you are using a color-matched filler, ensure that it blends in seamlessly with the surrounding flooring. If necessary, you can mix different colors of filler to achieve a perfect match.
Allow the wood filler to dry completely according to the manufacturer's instructions. Drying times can vary depending on the type of filler used and the ambient temperature and humidity. Avoid walking on the repaired area until the filler is fully cured.
Finishing Touches for a Seamless Repair: Once the wood filler is dry, it is time to sand the surface to create a smooth and even finish. Use fine-grit sandpaper (220-grit or higher) to gently sand the repaired area, blending it in with the surrounding flooring. Avoid sanding too aggressively, as this can damage the laminate surface. Use a sanding block or a foam sanding pad to ensure even pressure and prevent gouging.
After sanding, clean the area with a damp cloth to remove any sanding dust. If necessary, you can apply a sealant or a finish to protect the repaired area and enhance its appearance. Use a sealant or finish that is specifically designed for laminate flooring and follow the manufacturer's instructions carefully. Apply the sealant or finish in thin, even coats, allowing each coat to dry completely before applying the next.
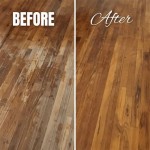
Finally, remove the painter's tape and inspect the repaired area. If there are any imperfections, repeat the sanding and finishing process until you are satisfied with the results. With careful preparation, precise application, and diligent finishing, you can achieve a seamless and long-lasting repair that restores the beauty and integrity of your laminate flooring.
While these steps are generally applicable, it's essential to carefully review and follow the specific instructions provided by the manufacturer of the wood filler and any accompanying products used in the repair process. Adhering to these instructions will maximize the effectiveness and longevity of the repair.

Roberts 3 Oz Dark Brown Wood Laminate And Vinyl Putty Pc7732 The Home

Roberts 3 Oz Gray Wood Laminate And Vinyl Putty Pc7728 The Home

4 Tips That Will Help You Get Rid Of Wood Flooring Gaps Esb

Wood Putty Filler Hardwood Laminate Floor Repair Kit 13 Colors Stain 0 7 Oz Each Seisso Paint Wal Com

Roberts 3 Oz Light Wood Laminate And Vinyl Putty Pc7726 The Home

Roberts 3 Oz Gray Wood Laminate And Vinyl Putty Pc7728 The Home

Wood Putty Vs Filler What S The Difference Bob Vila

Roberts 3 Oz Tan Wood Laminate And Vinyl Putty Pc7730 The Home

Diy Guide Filling Gaps In Wood Floors To Re Their Beauty

How To Repair Laminate Flooring Scratch Separating And Lifting
See Also