Sanding Wood Floors With Orbital Sander
Sanding wood floors with an orbital sander is a task that can be completed by both professionals and DIYers. Orbital sanders are relatively easy to use but require some practice to master. They are a good choice for sanding large areas quickly and efficiently.
Choosing the Right Orbital Sander
There are two main types of orbital sanders: random orbit sanders and gear-driven orbital sanders. Random orbit sanders are the most common type and are a good choice for general-purpose sanding. Gear-driven orbital sanders are more powerful and are a good choice for removing heavy finishes or sanding rough surfaces.
When choosing an orbital sander, consider the size of the sanding pad. A larger sanding pad will cover more area and will make the job go faster. However, a larger sanding pad will also be more difficult to control. For most jobs, a sanding pad between 5 and 6 inches in diameter is a good choice.
Preparing the Floor
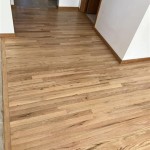
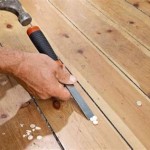
Before you start sanding, it is important to prepare the floor. This includes removing all furniture and other objects from the room and sweeping or vacuuming the floor to remove any loose debris. If the floor has any nails or staples sticking up, you will need to hammer them down below the surface of the wood.
Once the floor is prepared, you can start sanding. Start by using a coarse-grit sandpaper (60 or 80 grit). This will remove the old finish and level the floor. Once you have sanded the entire floor, you can switch to a finer-grit sandpaper (100 or 120 grit). This will smooth out the surface of the wood.
Sanding Techniques
When sanding with an orbital sander, it is important to use a consistent motion. Move the sander in a back-and-forth motion, overlapping each pass. Do not press down too hard on the sander, as this can damage the wood. Also, be careful not to sand in one spot for too long, as this can create a dip in the wood.
If you are sanding a large area, it is a good idea to take breaks every 15 or 20 minutes. This will help prevent the sander from overheating and will also give you a chance to rest your hands.
Finishing the Floor
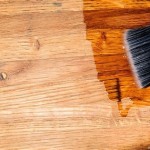
Once you have finished sanding the floor, you can apply a finish. There are a variety of finishes available, including polyurethane, oil-based finishes, and water-based finishes. Choose a finish that is appropriate for the type of wood you are sanding and the desired look.
To apply the finish, use a clean cloth or brush. Apply the finish in thin, even coats. Allow each coat to dry completely before applying the next coat. Once you have applied the desired number of coats, allow the finish to cure completely before walking on the floor.

Orbital Sanding For Hardwood Floors Techniques And Tips

Orbital Sanding For Hardwood Floors Techniques And Tips

How To Refinish Your Hardwood Floors Sanding With The Random Orbital Sander Floor Refinishing Services In Highland Park Plus Flooring

The Importance Of Proper Sanding Techniques In Orbital

Orbital Sanding Techniques For Pine Floors

Hand Sanding For Refinishing Old Wood Floors Mr Sander

Sanding Wood Floors Orbital Sander Bosch

How To Refinish Parquet Floors With Orbital Sanding

The Pros And Cons Of Orbital Sanding For Floor Restoration

Easy Hardwood Floor Sanding For The 1st Time Diy Orbital Sander Floors