Removing Scratches From Wood Floors: A Comprehensive Guide
Wood floors, prized for their warmth and natural beauty, are a popular flooring choice in many homes. However, the daily wear and tear of foot traffic, pets, and moving furniture can inevitably lead to unsightly scratches. While deep gouges might require professional attention, many superficial scratches can be effectively addressed with the right techniques and materials. This article provides a detailed guide on identifying, assessing, and removing scratches from wood floors.
Identifying the Type and Severity of Scratches
Before commencing any scratch removal procedure, it's crucial to accurately identify the type and severity of the damage. Scratches can vary significantly, ranging from minor surface imperfections to deeper abrasions that penetrate the finish and into the wood itself. Properly assessing the scratch will inform the most appropriate method for repair.
Surface Scratches: These are typically the most superficial and only affect the finish layer of the wood floor. They often appear as faint white lines or dull areas on the surface. Surface scratches are usually caused by fine particles of dirt or debris being dragged across the floor by shoes or furniture.
Finish Scratches: These scratches go slightly deeper, penetrating the finish layer and possibly reaching the stain layer beneath. They are more noticeable than surface scratches and may reveal a color difference between the finish and the underlying wood or stain.
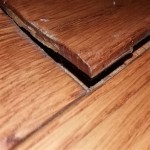
Deep Scratches: These are the most severe type of scratch, extending through the finish, stain, and into the wood itself. Deep scratches are often caused by sharp objects, heavy furniture being dragged across the floor, or pet claws. They are easily visible and can significantly detract from the appearance of the floor.
The depth of the scratch can be determined by running a fingernail gently across the affected area. If the fingernail catches, the scratch is likely a finish or deep scratch. If the fingernail glides smoothly over the scratch, it's probably a surface scratch.
Essential Tools and Materials for Scratch Removal
Having the right tools and materials on hand is essential for successful scratch removal. The specific items required will depend on the type and severity of the scratches being addressed. However, a general toolkit should include the following:
Cleaning Supplies: A clean floor is paramount. Gather a vacuum cleaner with a soft brush attachment, a microfiber mop, and a wood floor cleaner recommended by the flooring manufacturer.
Wood Floor Cleaner: Select a pH-neutral wood floor cleaner specifically formulated for the type of finish on your floor. Avoid using harsh chemicals or abrasive cleaners, as these can damage the finish and worsen the scratches.
Scratch Concealers: These products are designed to camouflage minor surface scratches. Options include wood markers, scratch crayons, and tinted waxes that match the color of the floor. Choose a color that closely matches the floor's finish for optimal results.
Touch-Up Finish: For finish scratches, touch-up finish products are necessary to restore the protective layer. Ensure the touch-up finish is compatible with the existing finish on the floor. Common types of wood floor finishes include polyurethane, varnish, and oil-based finishes.
Sandpaper: For deeper scratches, sandpaper is needed to smooth the affected area. Start with a fine-grit sandpaper (e.g., 220-grit) and gradually move to a finer grit (e.g., 320-grit or 400-grit) for a smooth finish. Always sand in the direction of the wood grain.
Wood Filler: Deep scratches that penetrate the wood may require wood filler to fill the void. Choose a wood filler that is stainable and sandable, and select a color that closely matches the color of the floor.
Putty Knife: A putty knife is used to apply wood filler evenly and to scrape away excess filler.
Lint-Free Cloths: Clean, lint-free cloths are essential for wiping away excess cleaner, applying scratch concealers, and buffing the floor.
Safety Gear: Wear appropriate safety gear, including gloves and a dust mask, to protect yourself from dust and chemicals.
Step-by-Step Scratch Removal Techniques
The following are step-by-step instructions for removing scratches from wood floors, categorized by the severity of the scratch.
Removing Surface Scratches:
1. Clean the Floor: Thoroughly vacuum the floor to remove any dirt or debris. Then, use a microfiber mop and wood floor cleaner to clean the affected area. Allow the floor to dry completely.
2. Apply Scratch Concealer: Select a scratch concealer (wood marker, scratch crayon, or tinted wax) that closely matches the color of the floor.
3. Fill the Scratch: Carefully apply the scratch concealer to the scratch, following the manufacturer's instructions. Ensure the scratch is completely filled with the concealer.
4. Remove Excess Concealer: Use a clean, lint-free cloth to wipe away any excess concealer from the surrounding area. Gently buff the area to blend the concealer with the existing finish.
5. Evaluate and Repeat: Evaluate the results. If the scratch is still visible, repeat the process until the scratch is effectively concealed.
Removing Finish Scratches:
1. Clean the Floor: Thoroughly clean the floor as described above.
2. Lightly Sand the Scratch: Use a very fine-grit sandpaper (e.g., 400-grit) to lightly sand the scratch. Sand in the direction of the wood grain to avoid creating further scratches. The goal is to lightly abrade the surface, creating a smooth surface for the touch-up finish to adhere to. Be careful not to sand through the existing finish.
3. Clean the Sanded Area: Use a clean, damp cloth to remove any sanding dust from the area. Allow the area to dry completely.
4. Apply Touch-Up Finish: Apply a thin, even coat of touch-up finish to the sanded area, following the manufacturer's instructions. Use a small brush or applicator pad to apply the finish smoothly.
5. Allow to Dry: Allow the touch-up finish to dry completely, according to the manufacturer's recommendations. This may require several hours or even overnight.
6. Apply Additional Coats (If Necessary): If the finish is not completely restored after the first coat, apply additional coats of touch-up finish, allowing each coat to dry completely before applying the next.
7. Lightly Buff: Once the final coat of finish is dry, lightly buff the area with a clean, lint-free cloth to blend the repaired area with the surrounding finish.
Removing Deep Scratches:
1. Clean the Floor: Thoroughly clean the floor as described above.
2. Sand the Scratch: Use a medium-grit sandpaper (e.g., 220-grit) to sand the scratch. Sand in the direction of the wood grain to remove any rough edges and to create a smooth surface for the wood filler. Gradually move to a finer grit sandpaper (e.g., 320-grit) to smooth the area further.
3. Clean the Sanded Area: Use a clean, damp cloth to remove any sanding dust from the area. Allow the area to dry completely.
4. Apply Wood Filler: Use a putty knife to apply wood filler to the scratch, filling it completely. Overfill the scratch slightly to allow for sanding. Ensure the wood filler is flush with the surrounding surface.
5. Allow to Dry: Allow the wood filler to dry completely, according to the manufacturer's instructions. This may require several hours or even overnight.
6. Sand the Wood Filler: Once the wood filler is dry, use a fine-grit sandpaper (e.g., 320-grit or 400-grit) to sand the filled area smooth. Sand in the direction of the wood grain to blend the filler seamlessly with the surrounding wood. Be careful not to sand through the existing finish.
7. Clean the Sanded Area: Use a clean, damp cloth to remove any sanding dust from the area. Allow the area to dry completely.
8. Stain the Wood Filler (If Necessary): If the wood filler does not match the color of the floor, apply a wood stain that closely matches the color. Apply the stain sparingly and wipe away any excess with a clean cloth. Allow the stain to dry completely.
9. Apply Touch-Up Finish: Apply a thin, even coat of touch-up finish to the repaired area, following the manufacturer's instructions. Use a small brush or applicator pad to apply the finish smoothly. Be sure to match the sheen (gloss level) of the existing finish (e.g., matte, satin, semi-gloss, gloss).
10. Allow to Dry: Allow the touch-up finish to dry completely, according to the manufacturer's recommendations.
11. Apply Additional Coats (If Necessary): If the finish is not completely restored after the first coat, apply additional coats of touch-up finish, allowing each coat to dry completely before applying the next.
12. Lightly Buff: Once the final coat of finish is dry, lightly buff the area with a clean, lint-free cloth to blend the repaired area with the surrounding finish.
Important Considerations:
Color Matching: Accurate color matching is crucial for achieving a seamless repair. It is best practice to test scratch concealers, wood filler, and stains in an inconspicuous area of the floor before applying them to the scratch.
Finish Compatibility: Ensure that the touch-up finish is compatible with the existing finish on the floor. Using an incompatible finish can result in discoloration, peeling, or other damage.
Sheen Matching: Matching the sheen of the existing finish is essential for a nearly invisible repair. Wood floor finishes are typically available in matte, satin, semi-gloss, and gloss finishes.
Professional Assistance: For deep or extensive scratches, it may be best to consult with a professional flooring contractor. Professionals have the expertise and equipment to repair more severe damage and to refinish entire floors if necessary.
By following these guidelines, homeowners can effectively remove scratches from their wood floors and restore their natural beauty.

How To Remove Scratches From Wood Floors Svb

How To Repair Wood Floor Scratches Quick Fix Friday Polished Habitat

3 Diy Way To Fix A Scratch In Hardwood Floors 5 Steps With Pictures Instructables

3 Ways To Eliminate Scratches On Wood Floors Youtube

How To Fix Scratches On Laminate Flooring Directflooring Direct

9 Tips For Removing Scratches On Hardwood Flooring Cosmaroma

How To Repair Wood Floor Scratches Quick Fix Friday Polished Habitat

10 Tips For Wood Floor Scratch Repair The Family Handyman

Fix Scratched Hardwood Floors In About Five Minutes The Chronicles Of Home

How To Fix Scratches On Hardwood Floors Twenty Oak
See Also