How To Fix Wood Flooring Gaps
Wood flooring, renowned for its natural beauty and durability, can sometimes develop gaps between planks. These gaps can detract from the aesthetic appeal and, if left unaddressed, may lead to structural issues and increased energy costs. Several factors contribute to gap formation, including seasonal changes in humidity, improper installation, and the natural expansion and contraction of wood. Fortunately, various methods exist to address this issue, ranging from simple DIY solutions to professional interventions.
1. Assess the Gaps and Determine the Cause
Before attempting any repairs, a thorough assessment of the gaps is crucial. Measure the width and length of the gaps to determine the extent of the problem. Consider the age of the flooring and the time of year the gaps appear. Gaps that appear primarily during drier months and close up during humid periods are likely due to seasonal changes. Consistent and large gaps may indicate an installation issue or subfloor problems.
2. Address Seasonal Gaps with Humidity Control
Seasonal gaps are a common occurrence due to the wood's response to changes in humidity. During dry periods, wood loses moisture and contracts, creating gaps. Conversely, in humid periods, wood absorbs moisture and expands, closing the gaps. Maintaining consistent indoor humidity levels between 30% and 50% can significantly minimize seasonal gapping. This can be achieved through the use of humidifiers during dry periods and dehumidifiers during humid periods. Regularly monitoring indoor humidity using a hygrometer is recommended.
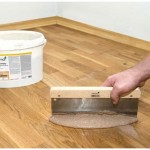
3. Fill Small Gaps with Wood Filler
For small gaps, typically less than 1/8 inch wide, wood filler provides a simple and effective solution. Select a wood filler that closely matches the color of your flooring. Apply the filler to the gap using a putty knife, ensuring it fills the void completely. Remove any excess filler and allow it to dry thoroughly according to the manufacturer's instructions. Once dry, lightly sand the filled area to create a smooth, even surface that blends seamlessly with the surrounding flooring.
4. Utilize Wood Shims for Wider Gaps
Wider gaps, generally between 1/8 inch and 1/4 inch, require a more robust approach. Wood shims, thin tapered pieces of wood, can be inserted into the gaps and glued securely. Select shims that closely match the thickness of the gap and the color of the flooring. Apply wood glue to the shim and carefully insert it into the gap. Tap it gently into place with a hammer, ensuring it is flush with the flooring surface. Remove any excess glue and allow it to dry completely before sanding and finishing the area.
5. Consider Rope and Wood Filler for Irregular Gaps
Irregularly shaped gaps can be challenging to fill with traditional methods. A combination of rope and wood filler can provide an effective solution. Select a rope of appropriate diameter and color. Apply wood glue to the rope and insert it into the gap, ensuring it fills the majority of the void. Then, fill the remaining space around the rope with wood filler. Smooth the filler and allow it to dry completely before sanding and finishing.
6. Consult a Professional for Significant Gaps or Subfloor Issues
Significant gaps, particularly those larger than 1/4 inch, or gaps accompanied by subfloor issues require professional intervention. A flooring professional can assess the extent of the damage, identify the underlying cause, and recommend the appropriate course of action. This may involve partial or complete floor replacement, subfloor repair, or other specialized techniques.
7. Prevent Future Gaps with Proper Installation and Maintenance
Preventing future gap formation involves ensuring proper installation techniques are followed. This includes acclimating the wood flooring to the environment before installation, leaving appropriate expansion gaps around the perimeter of the room, and using the correct subfloor materials. Regular maintenance, such as sweeping and vacuuming to remove debris, and prompt cleaning of spills, can also help preserve the integrity of the flooring and minimize the risk of future gap development. Applying a protective sealant according to manufacturer instructions can further protect the flooring from moisture damage and reduce seasonal expansion and contraction.

How To Fix Floating Floor Gaps The Easy Way

How To Fix Wood Floor Gaps Easily

How To Fix Floating Floor Gaps The Easy Way

How To Fill Gaps In Pine Boards Expert Techniques For A Seamless Look Mr Sander

Are Gaps In Wooden Floors Good Or Bad Craftedforlife

Should You Fill Gaps On A Timber Floor

Three Methods To Fill Gaps In Wood Flooring And Beyond Blog

Why Does My Hardwood Floor Have Gaps

Diy Guide Gap Filling In Wood Floors To Re Their Beauty

5 Tips To Keep Your Timber Floorboards In Perfect Nick