How To Fill Wood Floor Gaps
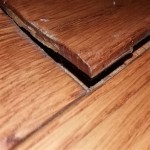
Gaps in wood floors are a common occurrence, particularly in older homes. These gaps can be caused by a variety of factors, including seasonal changes in humidity, the age of the wood, and structural movement within the building. While small gaps may be considered part of the character of a wood floor, larger gaps can be unsightly, collect dirt and debris, and even lead to drafts or moisture problems. Therefore, understanding how to properly fill these gaps is essential for maintaining the integrity and aesthetic appeal of wood flooring.
The process of filling wood floor gaps involves several steps, from assessing the size and nature of the gaps to selecting the appropriate filler material and applying it effectively. It's crucial to approach this task with care and attention to detail to ensure a long-lasting and visually pleasing repair. Improperly filled gaps can not only detract from the appearance of the floor but also create further problems down the line, such as the filler cracking or dislodging.
Before undertaking any gap-filling project, a thorough inspection of the floor is necessary. This will help determine the extent of the problem, identify the underlying causes of the gaps, and inform the choice of the most suitable repair method. Different sizes and types of gaps may require different approaches, and addressing the root cause of the gapping issue is crucial to prevent it from recurring.
Understanding the Causes of Wood Floor Gaps
Wood is a hygroscopic material, meaning it naturally absorbs and releases moisture from the surrounding environment. This process causes the wood to expand and contract, which is the primary reason for gaps appearing in wood floors. During periods of high humidity, the wood absorbs moisture and swells, closing the gaps. Conversely, during periods of low humidity, the wood releases moisture and shrinks, creating gaps between the planks. Seasonal changes are therefore a significant driver of wood floor gapping.
The age of the wood flooring is another important factor. Older wood tends to be drier and more prone to shrinkage than newer wood. Additionally, older floors may have experienced more cycles of expansion and contraction, which can weaken the joints between the planks and make them more susceptible to gapping. The original installation methods and the quality of the wood used can also influence the likelihood of gaps forming over time.
Structural movement within the building can also contribute to wood floor gaps. Settling foundations, shifting walls, or even vibrations from heavy traffic can cause the floorboards to shift and separate. In these cases, simply filling the gaps may not be a sufficient solution, as the underlying structural issues need to be addressed to prevent the gaps from reappearing.
Inadequate subfloor preparation or improper installation techniques can also lead to gapping. If the subfloor is not level or properly secured, the wood flooring may not be able to expand and contract evenly, resulting in gaps. Similarly, if the planks are not tightly fitted together during installation, gaps may appear over time as the wood settles and shifts.
Choosing the Right Filler Material
Selecting the appropriate filler material is crucial for a successful wood floor gap filling project. The choice of filler will depend on the size and type of gaps, the species and finish of the wood, and the desired aesthetic outcome. Several types of fillers are available, each with its own advantages and disadvantages.
Wood filler is a common choice for filling small to medium-sized gaps. It comes in a variety of colors and can be stained or painted to match the surrounding wood. However, wood filler can shrink and crack over time, especially in larger gaps, and it may not be suitable for areas with significant movement. It is generally best used for gaps less than 1/8th of an inch.
Epoxy wood filler is a more durable option that is less prone to shrinking and cracking. It is a two-part system that is mixed together before application and hardens into a strong, rigid material. Epoxy wood filler is a good choice for filling larger gaps or areas that are subject to heavy traffic. It is also water-resistant, making it suitable for use in damp environments.
Rope filler is a natural option that can be used to fill larger gaps. It consists of thin strands of wood that are twisted together to form a rope. The rope is then inserted into the gap and tapped into place. Rope filler provides a flexible and durable solution that allows the wood to expand and contract naturally. It can be stained or painted to match the surrounding wood and provides a rustic, textured appearance.
Wood shims can be used for extremely large gaps or gaps that are caused by structural issues. The shims are thin pieces of wood that are inserted into the gap to provide support and stability. Shims are typically used in conjunction with other fillers to create a more solid and long-lasting repair. It is important to choose shims that are made from the same species of wood as the floor for a cohesive appearance.
Sawdust and wood glue mixture is another option, particularly where a close color match is needed. This involves collecting sawdust from the actual flooring (sanding dust is ideal) and mixing it with wood glue to create a paste. The paste is then applied to the gaps. This method allows for excellent color matching, as the filler is made from the same wood as the floor. However, it can shrink upon drying, so multiple applications may be necessary.
Step-by-Step Guide to Filling Wood Floor Gaps
Once the appropriate filler material has been selected, the process of filling the wood floor gaps can begin. The following steps provide a general guide to the process, but it is important to consult the manufacturer's instructions for the specific filler material being used.
Preparation: Begin by thoroughly cleaning the area around the gaps. Remove any dirt, dust, debris, or old finish that may be present. A vacuum cleaner with a brush attachment is useful for removing loose particles. For stubborn dirt, a damp cloth can be used, but ensure the area is completely dry before proceeding.
Applying the Filler: Using a putty knife or similar tool, carefully apply the filler material to the gaps. Press the filler firmly into the gaps to ensure it is properly compacted. Overfill the gaps slightly, as the filler may shrink as it dries. For larger gaps, multiple applications may be necessary, allowing each layer to dry completely before applying the next.
Smoothing and Shaping: Once the filler has been applied, use the putty knife to smooth the surface and remove any excess material. The goal is to create a seamless transition between the filler and the surrounding wood. For rope filler, a putty knife or chisel can be used to tap the rope into place and trim any excess.
Sanding: After the filler has dried completely, sand the area smooth using progressively finer grits of sandpaper. Start with a coarser grit to remove any bumps or ridges, and then gradually move to finer grits to achieve a smooth, even surface. Be careful not to sand too aggressively, as this can damage the surrounding wood.
Finishing: Once the area has been sanded, it is time to apply a finish to protect the filler and blend it seamlessly with the existing floor. The type of finish will depend on the existing floor finish. Polyurethane, varnish, or lacquer are common choices. Apply the finish in thin, even coats, allowing each coat to dry completely before applying the next. Staining the filler prior to finishing may be necessary for achieving a uniform color.
Considerations for Expansion and Contraction: When using fillers like epoxy or wood filler, which lack the natural flexibility of wood, it's crucial to anticipate the floor's expansion and contraction. Overly rigid fillers can crack over time as the wood moves. One technique to mitigate this is to slightly undercut the edges of the gap before applying the filler. This creates a small channel that allows the surrounding wood to move without putting excessive stress on the filler.
Sealing Large Gaps with Backer Rod: For exceptionally large gaps (over ¼ inch), using a backer rod before applying the filler can be advantageous. A backer rod is a flexible foam material that is inserted into the gap to provide a backing for the filler. This reduces the amount of filler needed and prevents it from sinking too deeply into the gap. It also adds a degree of flexibility, allowing the filler to better accommodate wood movement. The backer rod should be slightly larger than the gap to ensure a snug fit.
Dealing with Seasonal Gaps: If the gaps are primarily seasonal, consider filling them during the drier months of the year when the wood is at its most contracted state. This will allow for maximum filler application and minimize the risk of the filler being compressed and squeezing out during the more humid months when the wood expands. This approach requires careful monitoring and may necessitate touch-ups as the seasons change.
Professional Assistance: For extensive or complex gapping issues, it may be beneficial to consult a professional flooring contractor. They have the expertise and equipment to accurately assess the problem and provide the most appropriate solution. Attempting to repair significant damage without the necessary knowledge and skills can lead to further complications and costly repairs.

Should You Fill Gaps On A Timber Floor

How To Fix Floating Floor Gaps The Easy Way

The Art Of Wood Floor Gap Filling Seamlessly Merging Elements For A Flawless Finish Sanding Floors

How To Fill In Gaps Between Hardwood Flooring With Wood Filler

3 Simple Ways To Fill In Gaps Wooden Floors Wikihow

5 Tips To Keep Your Timber Floorboards In Perfect Nick

Can You Fill Gaps In Old Wood Floors 7 Amazing Solutions

Can You Fill Gaps In Old Wood Floors 7 Amazing Solutions

How To Fix Wood Floor Gaps Easily Youtube

Filling Floor Gaps With Oakum Update 2 1 Years Later A Pretty Happy Home
See Also