How to Dry Wood Floors
Wood floors, with their natural beauty and durability, are a popular choice for homeowners. However, these floors are susceptible to moisture damage, which can lead to warping, buckling, and even mold growth. Timely and proper drying is crucial to prevent such issues and maintain the longevity of your wood floors.
Understanding the Importance of Drying Wood Floors
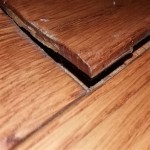
Wood floors, like any other wood products, are hygroscopic, meaning they absorb and release moisture from the surrounding environment. When exposed to excess moisture, wood expands, leading to various problems. If the moisture is not removed promptly, the wood can swell and warp, causing unevenness in the floor surface. This can create tripping hazards and affect the overall aesthetics of the floor. Furthermore, prolonged moisture exposure can facilitate the growth of mold and mildew, posing health risks to occupants.
The drying process is not a one-size-fits-all solution. The type of wood, the extent of moisture damage, and the specific circumstances surrounding the water damage all influence the drying method and time required. A thorough assessment of the situation is critical to ensure effective drying without causing further damage to the floor.
Methods for Drying Wood Floors
Drying wood floors requires a combination of techniques to effectively remove excess moisture. Some of the common methods employed include:
1. Air Drying
Air drying is the most straightforward method, involving exposing the affected area to circulating air. This method is generally effective for minor moisture issues. Open windows and doors to allow for natural ventilation, and consider using fans to increase air circulation. This method is best suited for situations where the water damage is not extensive and the wood is not heavily saturated. However, air drying can be time-consuming, especially in humid environments.
2. Dehumidifiers
Dehumidifiers are electrical appliances that remove moisture from the air. They are particularly effective in reducing humidity levels within a room, accelerating the drying process. Place the dehumidifier near the affected area and allow it to run continuously until the moisture levels are reduced to acceptable levels. This method is suitable for larger areas and can significantly reduce the drying time compared to air drying alone.
3. Heaters
Heaters can be used to raise the temperature of the room, promoting faster evaporation and potentially mitigating mold growth. However, it is crucial to use caution to avoid overheating the wood and causing damage. Use low-heat settings, and avoid direct exposure to the wood surface. It is recommended to consult with a professional for guidance before using heaters for drying wood floors.
4. Professional Drying Equipment
In cases of severe water damage, professional drying equipment, such as air movers and desiccant dehumidifiers, may be necessary. These specialized tools are more powerful than standard dehumidifiers and can effectively remove large amounts of moisture, even from saturated wood. Professionals can also utilize moisture meters to monitor the drying process and ensure the wood reaches acceptable moisture levels before proceeding with further repairs.
Drying Time and Other Factors
The drying time for wood floors varies significantly depending on several factors:
1. Type of Wood
Different wood species have varying water absorption and drying rates. Some hardwoods, like oak and maple, tend to dry more slowly than softwoods, like pine and spruce. Understanding the characteristics of the wood species involved is vital for estimating the drying time.
2. Extent of Damage
The amount of water absorbed by the wood directly impacts the drying time. Larger areas of saturation require longer periods to dry completely. Floors that have been submerged in water for a prolonged period will take longer to dry than those exposed to a minor spill.
3. Environmental Conditions
Ambient temperature, humidity, and air circulation all influence the drying process. Higher temperatures and low humidity accelerate drying, while cooler temperatures and high humidity can slow it down. Adequate ventilation is crucial for effective drying, allowing for the removal of moisture-laden air.
4. Drying Method
The drying method employed also affects the time required. Professional drying equipment can significantly reduce the drying time compared to air drying or dehumidifiers alone. However, the choice of method should be based on the severity of the damage and the resources available.
Remember that drying wood floors is a critical step in maintaining their integrity and longevity. By understanding the importance of drying, employing appropriate techniques, and considering the factors influencing drying time, homeowners can minimize the risk of water damage and preserve the beauty and value of their wood floors.

Wet Wood Floor Drying

How To Dry Your Hardwood Floors John K Eareckson Co

How To Dry Water Under Wood Floor 13 Steps With Pictures

How To Dry Water Under Wood Floor 13 Steps With Pictures

Wet Timber Wood Floor Drying Service New Life Restoration Nlr

How To Dry Water Under Wood Floor 13 Steps With Pictures

How To Remove Moisture From Wood Floors Dry Force

How To Dry Laminate Flooring With Water Under It

Wood Floor Dry Out Cupped Crowned Or Buckled Floors

How To Dry Water Under Wood Floor 13 Steps With Pictures


