How to Refinish Your Wood Floors: A Comprehensive Guide
Refinishing wood floors can dramatically enhance the appearance and value of a home. Over time, wood floors can accumulate scratches, dents, and wear that diminish their beauty. Refinishing involves sanding away the old finish and applying a new protective coating, restoring the floor to its original luster or even updating its look with a different stain. This process, while manageable for a dedicated homeowner, requires careful planning, the right tools, and a methodical approach. This article provides a detailed explanation of the essential steps involved in refinishing wood floors.
Before embarking on this project, consider the type of wood floor you have. Solid hardwood floors can typically be sanded and refinished multiple times because of their thickness. Engineered hardwood floors, however, have a thin veneer of real wood over a manufactured core. Depending on the thickness of the veneer, they may only withstand one or two refinishing cycles. If you are unsure of the type of flooring, consult with a flooring professional before proceeding. Attempting to sand an engineered floor too aggressively can damage it irreparably.
Safety is paramount when refinishing wood floors. Sanding creates a significant amount of dust, which can be harmful if inhaled. Wear a properly fitted respirator mask throughout the sanding process. Eye protection, such as safety glasses or goggles, is also crucial to prevent dust and debris from entering your eyes. Ear protection, such as earplugs or earmuffs, can reduce the noise from the sanding equipment, particularly the drum sander.
Preparation is Key: Clearing the Room and Assessing the Floor
The first and arguably most important step in refinishing wood floors is preparation. This phase involves clearing the room entirely of furniture, rugs, and any other obstructions. Remove baseboards and quarter-round molding carefully, as these will need to be reinstalled after the refinishing process. Numbering them before removal will help ensure they are reinstalled in the correct locations.
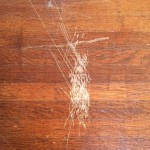
Thoroughly clean the floor to remove any dirt, dust, and debris. Vacuuming is essential, followed by a careful inspection for any protruding nails or staples. Use a nail set to drive these below the surface of the wood. Neglecting this step can damage the sanding equipment and result in uneven sanding. Repair any damaged or loose boards before sanding. Minor cracks and gaps can be filled with wood filler. For larger repairs, consider replacing the damaged boards with matching wood.
After cleaning and repairs, examine the existing finish. If the existing finish is wax, it must be completely removed before sanding. Mineral spirits can be used to dissolve the wax. Multiple applications may be necessary to ensure complete removal. Any residue left behind can contaminate the sandpaper and hinder the sanding process.
Sanding: The Art of Smoothness
Sanding is the core of the refinishing process. It involves removing the old finish and evening out the surface of the wood. This is typically done in stages, using progressively finer grits of sandpaper. The goal is to achieve a smooth, even surface that is ready to accept the new finish.
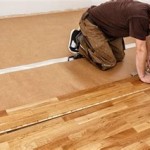
The primary tool for sanding is a drum sander, which is used for the main floor area. A drum sander requires careful handling to avoid damaging the floor. It is essential to keep the sander moving at all times. Letting it sit in one place can create dips or gouges in the wood. Overlap each pass by about half the width of the sander to ensure even sanding. Start with a coarse grit sandpaper, such as 36-grit, to remove the old finish and level the floor. Make several passes in the direction of the wood grain. Then switch to a medium grit, such as 60-grit, and sand the floor again, still following the grain. Finally, use a fine grit, such as 80 or 100-grit, for the final sanding pass.
An edger is used to sand along the edges of the room and in corners, where the drum sander cannot reach. The edger can be more difficult to control than the drum sander, so exercise caution. Use the same sequence of sandpaper grits as with the drum sander, starting with coarse and progressing to fine. Ensure that the edges are blended seamlessly with the main floor area sanded by the drum sander. Hand sanding with a sanding block and sandpaper may be necessary in tight corners or areas where the edger cannot reach.
After each sanding pass, thoroughly vacuum the floor to remove all dust and debris. The fine dust created during sanding can settle everywhere, so it is important to be meticulous in cleaning. Use a tack cloth to remove any remaining dust particles before proceeding to the next sanding stage.
Finishing: Protecting and Beautifying the Wood
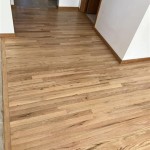
Once the sanding is complete and the floor is clean, it is time to apply the new finish. The choice of finish depends on the desired look and level of durability. Common options include polyurethane, varnish, and penetrating oil finishes. Water-based polyurethane finishes are generally considered more environmentally friendly and dry faster than oil-based finishes. However, oil-based finishes tend to be more durable and provide a warmer tone.
Before applying the finish, staining the floor is an option. Stain can enhance the natural grain of the wood or change the color completely. Apply the stain evenly, following the manufacturer's instructions. Allow the stain to dry completely before applying the finish. Always test the stain on a small, inconspicuous area of the floor first to ensure that you are satisfied with the color.
Apply the finish in thin, even coats, using a brush, roller, or applicator pad. Follow the manufacturer's instructions for the number of coats and drying time. Lightly sand the floor between coats with a fine-grit sandpaper (220-grit or higher) to ensure a smooth, even surface. Remove all dust and debris before applying the next coat. Allow the final coat of finish to dry completely before replacing the baseboards and quarter-round molding. Reinstall the molding carefully, using finishing nails. Fill the nail holes with wood filler that matches the molding and sand smooth.
Avoid walking on the newly finished floor until it is completely dry. Allow ample time for the finish to cure fully before replacing furniture and rugs. Curing times can vary depending on the type of finish and the environmental conditions. Consult the manufacturer's instructions for specific recommendations.
Maintaining a refinished wood floor involves regular cleaning and preventative measures. Sweep or vacuum the floor regularly to remove dirt and debris. Use a damp mop with a pH-neutral cleaner designed for wood floors. Avoid using harsh chemicals or abrasive cleaners, as these can damage the finish. Place rugs in high-traffic areas to protect the floor from wear. Use felt pads under furniture legs to prevent scratches and dents.
By following these steps carefully, a homeowner can successfully refinish their wood floors and restore their beauty and durability. While the process requires time, effort, and attention to detail, the results are well worth the investment. Refinished wood floors not only improve the aesthetic appeal of a home but also increase its overall value.

How To Refinish Hardwood Floors

How Long Does It Take To Refinish Hardwood Floors Refinishing Guide Reallyfloors America S Est Flooring

Refinishing Old Thin Hardwood Floors Lemon Thistle

Refinishing Hardwood Floors Everything You Need To Know

How To Sand Refinish Hardwood Floors Youtube

Refinishing Old Wood Flooring Your Step By Guide To A New Look

Refinishing Hardwood Floors Start To Finish

How To Refinish Hardwood Floors Give Your Home A New Look

Non Sandable Floor Refinishing N Hance

How To Achieve A Smooth Wood Floor Surface Sanding Floors