How To Stop Creaky Wood Floors
Creaky wood floors are a common annoyance in many homes, often signaling underlying issues with the subfloor, joists, or the flooring material itself. Addressing these creaks involves identifying the source of the noise and implementing appropriate repair strategies. This article provides a comprehensive guide on diagnosing and fixing creaky wood floors, ensuring a quieter and more stable home environment.
Identifying the Source of the Creak
Before attempting any repairs, pinpointing the precise location of the creak is crucial. Creaks often occur where the flooring material rubs against another surface, such as the subfloor, joists, or adjacent boards. Start by walking across the floor slowly and deliberately, paying close attention to the areas where the noise is most pronounced. Note the specific location and the conditions under which the creak occurs (e.g., only when weight is applied, only in certain areas of the room).
Consider the type of flooring in use. Solid hardwood, engineered hardwood, and laminate flooring each possess unique characteristics that can influence the nature and cause of creaks. Solid hardwood is particularly susceptible to changes in humidity, which can lead to expansion and contraction, resulting in friction and noise. Engineered hardwood, with its layered construction, is generally more stable but can still creak if improperly installed or if the subfloor is uneven. Laminate flooring, being a floating floor, relies on a smooth and level subfloor for proper performance. Imperfections in the subfloor can cause the laminate planks to rock and creak.
Examine the subfloor. The subfloor is the foundation upon which the flooring material is laid. Common subfloor materials include plywood and oriented strand board (OSB). Check for signs of damage, such as water stains, warping, or delamination. These issues can compromise the integrity of the subfloor and contribute to creaking. Use a level to check for unevenness in the subfloor surface. Significant dips or humps can indicate underlying structural problems that need to be addressed before attempting to fix the flooring itself.
Investigate the joists. Joists are the horizontal structural members that support the subfloor. Access to the joists is typically available from the basement or crawl space. Inspect the joists for signs of damage, such as rot, insect infestation, or cracks. Look for loose connections between the joists and the subfloor. These connections are usually secured with nails or screws, which can loosen over time due to vibrations and normal wear and tear. Use a flashlight to carefully examine the joists and surrounding areas for any abnormalities.
Addressing Common Causes of Creaking
Once the source of the creaking has been identified, targeted repairs can be implemented. Several common causes of creaking wood floors can be addressed with relatively simple techniques.
Loose Nails or Screws: One of the most frequent causes of creaking is loose fasteners in the subfloor or flooring. Over time, nails and screws can work their way loose due to vibrations and changes in humidity. To remedy this, drive new screws into the subfloor through the existing flooring, ensuring they penetrate the joists. Use screws that are long enough to provide a secure hold but not so long that they protrude through the ceiling below. Countersink the screws slightly to avoid creating a tripping hazard and conceal them with wood filler that matches the flooring color.
Gaps Between Flooring Boards: Solid hardwood floors, in particular, are prone to developing gaps between boards as they expand and contract with changes in humidity. These gaps can create friction as the boards rub against each other, resulting in creaking. Humidifying the room can sometimes help to reduce the gaps by allowing the wood to expand. In severe cases, it may be necessary to fill the gaps with wood filler or wood shims. Choose a wood filler that is specifically designed for use with hardwood floors and matches the color of the existing flooring. Wood shims can be carefully tapped into the gaps to provide support and prevent movement.
Subfloor Issues: Problems with the subfloor, such as unevenness or delamination, can also lead to creaking. If the subfloor is uneven, it may be necessary to apply a self-leveling compound to create a smooth and even surface before installing or repairing the flooring. Delaminated subfloor should be repaired or replaced, depending on the extent of the damage. Small areas of delamination can often be repaired with wood glue and screws. Larger areas may require replacing the affected sections of the subfloor. Ensure that the new subfloor material is of the same thickness and quality as the existing subfloor.
Joist Problems: Loose connections between the subfloor and the joists are a common cause of creaking. To reinforce these connections, apply construction adhesive between the subfloor and the joists and then screw the subfloor securely to the joists. Use screws that are long enough to penetrate the joists but not so long that they protrude through the ceiling below. Wood shims can be used to fill gaps between the subfloor and the joists, providing additional support and preventing movement. If the joists themselves are damaged, they may need to be repaired or replaced by a qualified contractor.
Specific Repair Techniques
Several specific repair techniques can be employed to address creaking wood floors, depending on the underlying cause and the type of flooring.
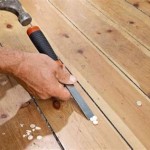
Using Shims: Shims are thin, tapered pieces of wood that can be used to fill gaps between the subfloor and the joists or between flooring boards. They provide support and prevent movement, reducing or eliminating creaking. To use shims, locate the area where the creaking is most pronounced and gently tap the shims into the gap using a hammer and a block of wood to protect the surrounding surfaces. Once the shims are securely in place, trim off any excess material with a utility knife or a saw. Be careful not to over-tighten the shims, as this can cause the flooring to buckle or warp.
Applying Lubricant: In some cases, creaking can be caused by friction between flooring boards or between the flooring and the wall. Applying a lubricant, such as graphite powder or talcum powder, can reduce this friction and eliminate the noise. Sprinkle the lubricant along the seams between the boards or between the flooring and the wall, and then work it into the cracks with a brush or a cloth. Wipe away any excess lubricant to prevent staining or discoloration.
Installing Additional Fasteners: If loose nails or screws are the cause of the creaking, installing additional fasteners can help to secure the flooring and prevent movement. Use screws that are long enough to penetrate the subfloor and the joists but not so long that they protrude through the ceiling below. Countersink the screws slightly to avoid creating a tripping hazard and conceal them with wood filler that matches the flooring color.
Using Construction Adhesive: Construction adhesive can be used to bond the subfloor to the joists or to bond flooring boards to the subfloor. Apply a bead of construction adhesive along the seams between the subfloor and the joists or between the flooring boards and the subfloor, and then press the surfaces together firmly. Allow the adhesive to dry completely before walking on the floor.
Replacing Damaged Flooring Boards: If a flooring board is severely damaged or warped, it may need to be replaced. Carefully remove the damaged board using a chisel and a hammer, being careful not to damage the surrounding boards. Install a new board of the same size and type, using construction adhesive and nails or screws to secure it in place. Sand the new board to blend it with the surrounding flooring and apply a finish that matches the existing finish.
Addressing creaky wood floors requires a systematic approach that involves identifying the source of the noise, assessing the underlying causes, and implementing appropriate repair techniques. While some repairs can be performed by homeowners, more complex issues may require the expertise of a qualified flooring contractor. Proper maintenance and preventative measures, such as controlling humidity levels and addressing water damage promptly, can help to prevent creaking and extend the life of wood floors.

Quick Fix For Squeaky Floors With Wd 40

Stop Creak 1 06 Fl Oz Squeaky Floor Repair Lubricant For Laminate Engineered And V Groove Wood Floors Madscuk30a The Home

How To Fix Squeaky Floors Diy Family Handyman

The Tricks To Fix A Squeaky Wood Floor

How To Fix A Squeaky Floor Repair

How To Fix Squeaky Floors The Home

Squeaky Wood Floor Repair Fix A

How To Fix A Squeaky Floor Repair

The Tricks To Fix A Squeaky Wood Floor Youtube

How To Fix A Squeaky Floor Quality Hardwoods Superior Design Palo Duro