How To Fix A Squeaky Wood Floor From Above
Squeaky wood floors can be a common annoyance in many homes. While they might seem like a minor issue, persistent squeaks can be disruptive and even indicate underlying structural problems. Addressing these squeaks promptly can prevent further damage and restore peace and quiet to the living space. This article provides a comprehensive guide on how to fix a squeaky wood floor from above, focusing on methods that minimize disruption and are suitable for most homeowners.
Before embarking on any repair, it's crucial to identify the source of the squeak. This often involves having someone walk across the floor while listening carefully to pinpoint the exact location of the noise. Squeaks are generally caused by the floorboards rubbing against each other, against the subfloor, or against nails or screws. Once the location is identified, the appropriate repair method can be selected.
There are several approaches to fixing squeaky floors from above, ranging from simple solutions like using shims to more involved techniques like screwing down the floorboards directly into the joists. The best method will depend on the severity of the squeak and the construction of the floor.
Understanding the Cause of Squeaks
To effectively address a squeaky floor, it is essential to understand the underlying causes. The most common reason for squeaks is the movement of wood against wood. This can occur for several reasons, including:
Loose Fasteners: Over time, nails or screws holding the floorboards or subfloor in place can loosen. This creates space for the wood to move and rub, resulting in a squeak.
Subfloor Separation: The subfloor, which lies beneath the finished floor, can separate from the joists (the horizontal beams that support the floor). This separation allows the subfloor to flex and rub against the joists, causing a squeak.
Floorboard Movement: Individual floorboards can expand and contract with changes in humidity. This movement can cause them to rub against each other or against the subfloor, leading to squeaks.
Warped or Damaged Wood: Over time, floorboards or the subfloor can warp, cup, or become damaged due to moisture or age. This can create uneven surfaces that rub together and cause squeaks.
By understanding the potential causes, one can better diagnose the problem and choose the most effective solution. Listening carefully to the type of squeak can also offer clues. A deep, resonant squeak might indicate subfloor separation, while a high-pitched squeak could suggest loose fasteners or floorboard movement.
Simple Solutions: Lubricants and Shims
For minor squeaks, a few simple solutions can often provide immediate relief. These methods are minimally invasive and can be attempted before resorting to more complex repairs.
Lubricants: Applying a lubricant between the floorboards can reduce friction and eliminate squeaks. Powdered graphite is a popular choice, as it is dry and won't attract moisture. It can be applied along the seams between the floorboards in the affected area. Talcum powder can also be used, but it may need to be reapplied more frequently. To apply either powder, sprinkle a small amount along the seams and then work it in with a soft brush or cloth. Wipe away any excess powder.
Shims: If the squeak is caused by a small gap between the floorboard and the subfloor or joist, a shim can be used to fill the gap and stabilize the board. Shims are thin, tapered pieces of wood or plastic that can be carefully inserted into these gaps. To use a shim, gently pry up the edge of the floorboard with a putty knife or scraper. Insert the shim, tapping it lightly with a hammer until it is snug but not too tight. Be careful not to force the shim, as this could damage the floorboard. Once the shim is in place, test the area to see if the squeak is gone. If necessary, trim any excess shim material with a utility knife.
These simple solutions are best suited for isolated squeaks that are not caused by underlying structural problems. If the squeaks are widespread or persistent, more substantial repairs may be necessary.
More Involved Repairs: Screwing Down Floorboards and Using Squeak-Ender Kits
When lubricants and shims prove ineffective, a more direct approach is often required. This usually involves securing the floorboards more firmly to the subfloor or joists.
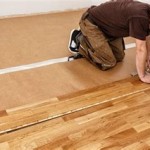
Screwing Down Floorboards: This method involves driving screws through the floorboards and into the joists or subfloor below. It is a common and effective way to eliminate squeaks caused by loose fasteners or floorboard movement. To begin, locate the joists beneath the floorboards. This can be done using a stud finder, which detects the location of the joists by sensing changes in density. Once the joists are located, pre-drill pilot holes through the floorboards at an angle towards the joist. This angle will help to pull the floorboard down and eliminate the squeak. Choose screws that are long enough to penetrate the floorboard and at least one inch into the joist. Drive the screws into the pilot holes, being careful not to overtighten them. Overtightening can strip the screws or damage the floorboards. Once the screws are in place, fill the screw holes with wood filler that matches the color of the floor. Sand the filler smooth and apply a matching finish.
Squeak-Ender Kits: These kits are designed to fix squeaks from below by attaching to the joists and pushing up against the subfloor. While technically a "from below" solution, some variations can be adapted for use from above, especially in basements or crawl spaces with easy access. These kits typically include metal brackets, screws, and shims. The brackets are attached to the joists, and the shims are used to fill the gap between the bracket and the subfloor. This effectively eliminates the movement that causes the squeak. To use a Squeak-Ender kit, first identify the location of the squeak. Then, access the area from below (if possible). Attach the brackets to the joists directly beneath the squeak. Insert the shims between the brackets and the subfloor, tightening them until the squeak is gone. These kits are particularly useful for fixing squeaks caused by subfloor separation.
These methods require more skill and effort than simple lubrication or shimming. However, they are often necessary to effectively eliminate stubborn squeaks and prevent them from returning.
When choosing screws, consider using screws specifically designed for wood floors. These screws typically have a smaller head that can be easily concealed with wood filler. They also have a thread pattern that provides a strong grip in wood.
It is also important to consider the type of wood used in the floorboards. Hardwoods, such as oak or maple, will require more force to penetrate than softer woods, such as pine. Adjust the drilling and screwing techniques accordingly.
Properly countersinking the screws is crucial for a seamless finish. Countersinking involves creating a small recess in the floorboard that allows the screw head to sit flush with the surface. This prevents the screw head from protruding and creating a tripping hazard. A countersink drill bit can be used to create these recesses.
When filling the screw holes with wood filler, choose a filler that is specifically designed for wood floors. These fillers are typically stainable and sandable, allowing for a seamless blend with the surrounding wood. Follow the manufacturer's instructions for applying and drying the filler.
Sanding the filler smooth is essential for a professional-looking finish. Use fine-grit sandpaper to gently sand the filler until it is flush with the surface of the floor. Be careful not to sand too aggressively, as this could damage the surrounding wood.
Finally, apply a matching finish to the filled screw holes to conceal the repair and protect the wood. Choose a finish that is compatible with the existing finish on the floor. Follow the manufacturer's instructions for applying and drying the finish.
By following these steps carefully, one can effectively screw down floorboards and eliminate squeaks while achieving a professional-looking finish.
For persistent or widespread squeaks, consulting a professional flooring contractor is advisable. They can diagnose the underlying cause of the squeaks and recommend the most appropriate repair method. They also have the expertise and tools to handle more complex repairs, such as replacing damaged floorboards or reinforcing the subfloor.

The Tricks To Fix A Squeaky Wood Floor

How To Fix Squeaky Floors The Home

How To Fix Squeaky Floors The Home

The Tricks To Fix A Squeaky Wood Floor Youtube

How To Repair Squeaky Floors

How To Fix Squeaky Floors Diy Family Handyman

How To Fix A Squeaky Floor Quality Hardwoods Superior Design Palo Duro

How To Fix Floor Squeaks In Old Houses The Handyman

How To Fix A Squeaky Floor Repair

How To Use Snap Off Screws Fix Squeaky Hardwood Floors
See Also